This blog is simply a way for me to talk about LEGO and what I am building. Whether anyone will read it or not, who knows! It just feels good to write about it.
The current project that I am currently working on has been a very long time coming…around 8 years to be exact. I have always wanted to build a steam locomotive out of LEGO and finally I am getting around to it.
I will start with a brief history…
First, I have always loved trains. I remember wanting to be a engineer when I was little. I am also quite fascinated with the Chessie System for some reason. My dad had HO Chessie trains in the late 70’s and early 80’s, but I cannot recall if I ever actually saw Chessie trains where I grew up in southern Ohio so I am not sure where the fascination comes from.
When I back got into the LEGO hobby in 2003 after my dark ages (actually I started buying Star Wars sets in 1999, but never built anything on my own until 2003) I built mostly buildings, houses and skyscrapers. However, It didn’t take me too long to want to build trains. After all, I was a member of a LEGO train club (COLTC). The first locomotive that I built wasn’t that great, I don’t even remember what is was exactly, an SD40 or something similar. Due to my fascination with Chessie, my next locomotive was a Chessie SW1200 Switcher. It was built around 2004. It turned out okay, but not great. I also built some rolling stock, but no more locomotives for a while.
 After a few years, I did not have time for the club any more, so my LEGO hobby slowed down quite a bit. At least in brick. I began using MLCAD a lot and designed quite a few locomotives and rolling stock (and buildings and lots of other stuff!). A few things did get built in brick eventually, but the majority are still sitting in digital form.
I finally decided it was time to build a large steam engine. After seeing so many great ones on the internet, I was anxious to join the “club”. After doing some research I came across the Chessie Steam Special. It is a Reading T-1 Northern, a 4-8-4 that ran excursions for Chessie in 1977 and 1978. I knew this was the engine that I had to build.
 The unique color scheme is part of what really draws me to it. I did take some liberties with the colors when converting to LEGO to make it a little “prettier”. I believe the red is supposed to be more towards orange, but that color really doesn’t exist in LEGO and orange doesn’t look as nice in my opinion. The biggest struggle I had was whether the engine itself was black or dark blue. I have been designing it in dark blue because that make it very unique and looks great. The question was always in the back of mind of what color was it really was though. Some pictures made it look black, while other made it look dark blue. I finally read somewhere that it was indeed a dark blue. I have not confirmed this yet, but the engine had to have some major work done on it between the ’77 and ’78 excursion seasons, so I wonder if it was black and went blue or vice verse during this work. There is an obvious blue square with a yellow/gold outline on the cylinders in some pictures (including the one above), but it is clearly not there in other pictures. I actually found a book that documents this “Revival” as they call it. I have not had a chance to read it yet, but glancing through it, there doesn’t seem to be any mention the color or of painting the engine. There is, however, I picture at the end that does show the blue square on the cylinder so I am going to conclude that then engine was painted blue between the ’77 and ’78 season.
I began to design the engine in LEGO in early 2008 (or maybe late 2007, the .ldr file of the first version is dated 3/7/2008). This first version looked okay, it was 6 wide with 4 wide boiler made of regular slopes. Nothing too exciting. Very basic. It was nowhere near complete though. A lot of pieces were just floating.
 I continued to refine it further over the years (yes years) until finally in the beginning of 2011 I made my first attempt at building it brick. At this point the engine was 8 wide with a 6 wide boiler that was made of tiles and cheese slopes instead of just regular slopes and bricks like the original. I got the boiler and cab built and a very basic version of the drivers for it to sit on, but it just didn’t look right. I eventually got stuck and just stopped working on it.
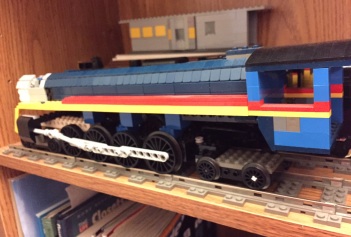
So it sat on a shelf for 4 years (time really does fly) until the beginning of this year (2015) when I decided that I was finally going to get it done…


